Monthly Archives: March 2016

Automate Facebook Login and Status Update with Python Selenium

You can download the source code from my GitHub page
https://github.com/bikrammann/web_crawler/blob/master/Automate_Facebook_Login_and_Status_Update.py

Step 1 – Required imports


import time
from selenium import webdriver
from selenium.webdriver.common.by import By
from selenium.webdriver.common.action_chains import ActionChains
from selenium.webdriver.common.keys import Keys

Step 2 – Create Firefox object and use get method then sleep for 5 seconds


driver = webdriver.Firefox() # Firefox Browser
driver.get('http://www.facebook.com')
time.sleep(5)

To use Google Chrome with Selenium, First install Google Chrome Driver from ‘https://sites.google.com/a/chromium.org/chromedriver/’. Then replace ‘C:/chrome/chromedriver.exe’ with your chrome driver path


# Replace
driver = webdriver.Firefox() # Firefox Browser
# With
driver = webdriver.Chrome('C:/chrome/chromedriver.exe') # Chrome Browser

Step 3 – Locate email address and password field on Facebook Login Page


username = driver.find_element_by_name("email")
password = driver.find_element_by_name("pass")

Step 4 – Add values to email address and password fields

 
username.send_keys("[email protected]")
password.send_keys("password123")

Step 5 – Sleep for 1 second, then press the login button


time.sleep(1)
driver.find_element_by_id("loginbutton").click()

Step 6 – Locate the text box where it says “What’s on your mind?”


message = driver.find_element(By.XPATH, "//textarea[@name='xhpc_message']")

Step 7 – Click the text box area to get it in focus where it says “What’s on your mind?”


ActionChains(driver) \
    .key_down(Keys.CONTROL) \
    .click(message) \
    .key_up(Keys.CONTROL) \
    .perform()

Step 8 – Message for status update


message.send_keys("Ha Ha")

Step 9 – Press the post button to submit the status update


driver.find_element(By.XPATH, '//button[text()="Post"]').click()
time.sleep(5)

Step 10 – Close the browser


driver.close()
Error: ‘xslt-config’ is not recognized as an internal or external command

Error: 'xslt-config' is not recognized as an internal or external command
make sure the development packages of libxml2 and libxslt are installed

If you are getting this message when trying to pip install lxml or install lxml via Pycharm project interpreter, here the solution https://www.bikrammann.com/error-microsoft-visual-c-10-0-is-required-unable-to-find-vcvarsall-bat/

Error: Microsoft visual C++ 10.0 is required (Unable to find vcvarsall.bat)

I got this error message ” Error: Microsoft visual C++ 10.0 is required (Unable to find vcvarsall.bat) ” when I was trying to install lxml package on windows 10 using the command

pip install lxml

Here is the solution to fix this problem

Step 1 – Upgrade pip, setuptools and virtualenv

python -m pip install -U pip
pip install -U setuptools
pip install -U virtualenv

Step 2 –  Download the latest version of lxml MS Windows installer from this link https://pypi.python.org/pypi/lxml/. Then move the downloaded file
lxml-3.6.0.win32-py3.2.exe  to c:\python35\Scripts ( or where your python package is installed ).
Then use easy_install to install the windows installer

easy_install lxml-3.6.0.win32-py3.2.exe

Step 3 – Now you should be able to install the lxml package using easy_install

easy_install lxml

If everything works you will see a message similar to this

Installed python\lib\site-packages\lxml-3.6.0-py3.5-win32.egg
Processing dependencies for lxml=3.6.0
Finished processing dependencies for lxml=3.6.0

CSV to Excel (.xlsx) Converter Python – xlsxwriter

CSV to Excel Converter program in Python

This program will convert .CSV ( Comma-Separated Values ) Files to Excel (.XLSX ) format using python XlsxWriter module. You can download the file directly from my GitHub page:
https://github.com/bikrammann/mannpetroleum/blob/master/csv_to_xlsx.py

Below is the documentation as how the program works.

Step 1 – Required modules for the program


import csv, os
from glob import glob
from xlsxwriter.workbook import Workbook

Step 2 – This for loop will give you list of csv files in the specified directory. Change  ‘csvFiles/*.csv’ to whatever directory your files are in.


for csvfile in glob('csvFiles/*.csv'):

Step 3 – When you loop through the list you will get something like ‘csvFiles/report.csv’ as output if you print the variable csvfile. But we just want the file name without the full path so we are going to use os.path.basename(csvfile) which will give us ‘report.csv’ as output. Then we are going to split the file name and extension using the split function and we will get a list like [ ‘report’, ‘csv’ ]. Lastly we are going to use List Indices to access the first element in the sequence and store it in the variable name.


name = os.path.basename(csvfile).split('.')[-2]

Step 4 – Then we are going to make new instance of Workbook class and provide parameters to the constructor. Workbook constructor takes two parameters (filename, options). For complete list of options refer to the workbook class documentation . Then we are going to use the workbook object to add a new worksheet using the add_worksheet() method and store it in the variable worksheet.


workbook = Workbook('xlsxFiles/' + str(name) + '.xlsx', {'strings_to_numbers': True,
'constant_memory': True})
worksheet = workbook.add_worksheet()

Step 5 – Now we are going to open the csvfile in the read mode and get the reader object using csv.reader(f) and store it in the variable r. Once we have the reader object then we can loop through it using enumerate to get the row. Once we have row then we can loop through it using enumerate to get the columns. While we are inside the inner most loop we are going to use worksheet object to write data using the worksheet.write() method. write() method takes three + parameters worksheet.write(row, col, *args), for more information refer to the worksheet class documentation


with open(csvfile, 'r') as f:
r = csv.reader(f)
for row_index, row in enumerate(r):
for col_index, data in enumerate(row):
worksheet.write(row_index, col_index, data)

Step 6 – Finally we are going to close the Excel file using the close() method


workbook.close()
print("-------------------------------------------")
print(" .CSV to .XLSX Conversion Successful")
print("-------------------------------------------")

If everything works you should see this message “.CSV to .XLSX Conversion Successful “. If you are still having problems making it work, go ahead and leave me a comment with description of the problem. Will try to get back to you asap 🙂

MITx: 6.00.1x Introduction to Computer Science and Programming Using Python

MITx: 6.00.1x Introduction to Computer Science and Programming Using Python

MITx: 6.00.1x Introduction to Computer Science and Programming Using Python

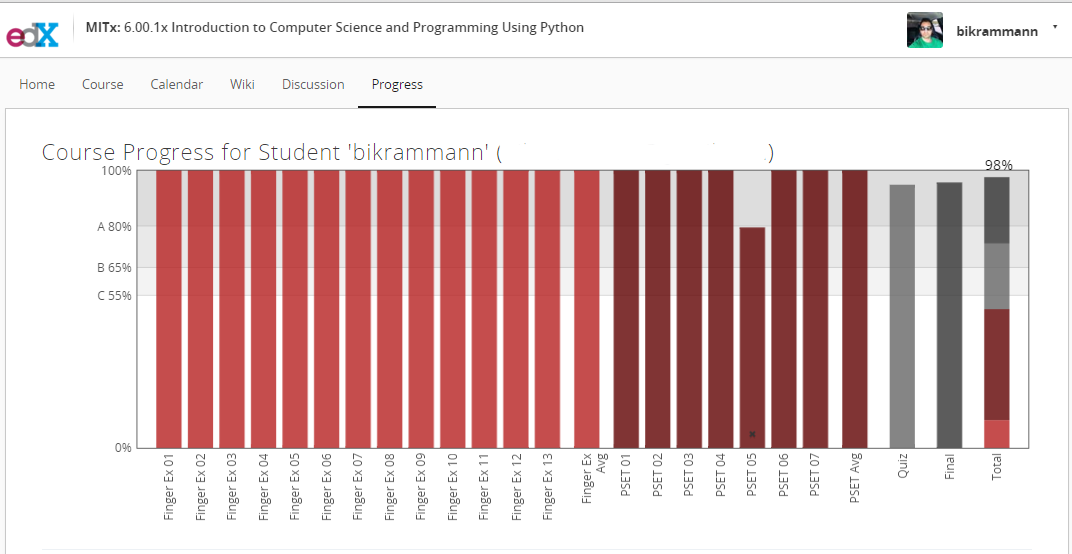
Just got done taking MIT’s Python Course “Introduction to Computer Science and Programming – 6.00.1x “. This course is taught by MIT Professor Eric Grimson via edX.org and covers the same material which is taught in class at MIT. Edx version of MIT course is broken in two parts:

PART 1:
MITx: 6.00.1x Introduction to Computer Science and Programming Using Python
https://www.edx.org/course/introduction-computer-science-mitx-6-00-1x-6

PART 2:
MITx: 6.00.2x Introduction to Computational Thinking and Data Science
https://www.edx.org/course/introduction-computational-thinking-data-mitx-6-00-2x-3

MITx: 6.00.1x – Review

  • Length – 9 weeks
  • Effort – 15 hours/week
  • Institution – MITx

This course has 13 finger exercises, 7 problem sets, 1 mid term quiz and 1 final exam.

Grade Percentage:

  • Finger Exercises – 10%
  • Problem Sets – 40%
  • Mid Term Quiz – 25%
  • Final Exam – 25%

Topics you will learn about:

  • Lecture 1 – Introduction to Computation
  • Lecture 2 – Core Elements of Programs
  • Lecture 3 – Simple Algorithms
  • Lecture 4 – Functions
  • Lecture 5 – Recursion
  • Lecture 6 – Objects
  • Lecture 7 – Debugging
  • Lecture 8 – Assertions and Exceptions
  • Lecture 9 – Efficiency and Orders of Growth
  • Lecture 10 – Memory and Search
  • Lecture 11 – Classes
  • Lecture 12 – Object Oriented Programming
  • Lecture 13 – Trees

This was one of the best programming course that I have taken so far. Not only you will learn how to program but you will also get good overview of computer science concepts in general such as Algorithms, Recursion, Debugging, Assertions and Exceptions, Efficiency and Orders of Growth. This course will give you enough confidence to move on to more advance courses like how compilers work, operating systems, data structures & algorithms etc. Learning the basics and syntax of any programming language is important but in order to be a better programmer you have to understand these core concepts.

Http to Https redirect on Tomcat

This post assumes that:

  • You have bought the SSL
  • Have successfully installed it on Tomcat with Keytool

Now you are trying to figure out how to automatically redirect http to https.

You will need to edit two files under Tomcat configuration: server.xml and web.xml. Then restart tomcat to reflect the changes.

Step 1:

Open server.xml and find

<Connector port="80" protocol="HTTP/1.1"
 connectionTimeout="20000"
 redirectPort="8443" />

Change to

<Connector port="80" protocol="HTTP/1.1"
 connectionTimeout="20000"
 redirectPort="443" />

And make sure you have these lines as well. Change KeystoreFile and KeystorePass according to your details

<Connector port="443" protocol="HTTP/1.1" SSLEnabled="true"
 maxThreads="150" scheme="https" secure="true"
 keystoreFile="/home/server/cert/cert.tomcat.jks"
 keystorePass="certificatename" clientAuth="false" sslProtocol="TLS">
</Connector>

Step 2:

Open web.xml ( not the one under tomcat/conf/web.xml but where your site folder is something like /site-folder/WEB-INF/conf/web.xml) and add these lines before the ending </web-apps> tag.

<security-constraint>
 <web-resource-collection>
 <web-resource-name>Protected Context</web-resource-name>
 <url-pattern>/*</url-pattern>
 </web-resource-collection>
 <!-- auth-constraint goes here if you require authentication -->
 <user-data-constraint>
 <transport-guarantee>CONFIDENTIAL</transport-guarantee>
 </user-data-constraint>
</security-constraint>

Now restart the tomcat and all pages should redirect to https